codrone mini_Python_Junior part2(變數、迴圈、條件式、載入)
Python_Junior_2A_Viarables變數
Step 1:
| 動機
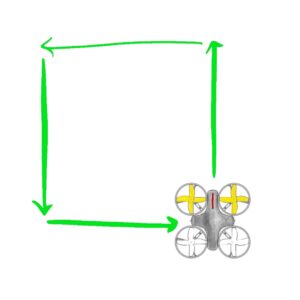
在我們進入變數前,您需了解變數將在什麼情況下使用。讓我們回顧怎麼編程一個正方形的飛行路線。 首先,請編寫一個程式,讓無人機呈正方形飛行。在正方形的每一邊,請至少讓CoDrone Mini飛半秒(0.5seconds)
import CoDrone_mini

drone = CoDrone_mini.CoDrone()

drone.pair()


drone.takeoff()
drone.hover(3)


drone.set_pitch(30)
drone.move(0.5)


drone.set_pitch(0)
drone.set_roll(-30)
drone.move(0.5)


drone.set_roll(0)
drone.set_pitch(-30)
drone.move(0.5)


drone.set_pitch(0)
drone.set_roll(30)
drone.move(0.5)

drone.land()
現在,請將所有移動指令的持續時間從0.5增加到1,使您的正方形變更大。 現在,請再次增加所有移動指令的秒數,使您的正方形變更大。 呼! 每次更改每行程式碼都很耗時費力。 你認為我們該如何將這段程式碼變得更有效率呢? |
Step 2:
| 什麼是變數?
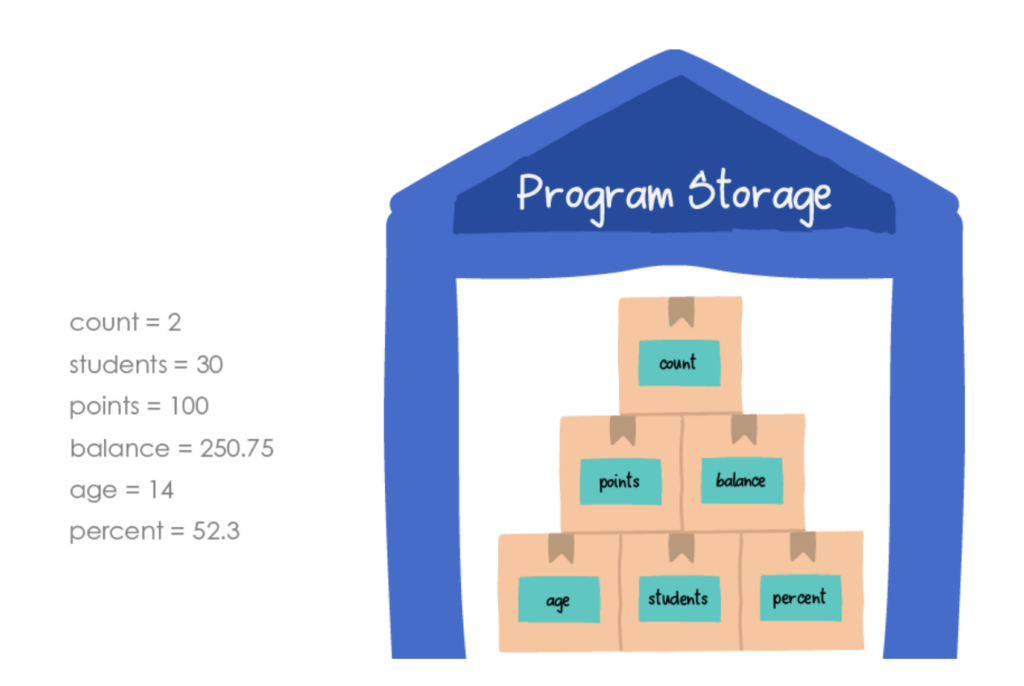
在程式語言中,變數是在所有編程語言和大多數程式中都及其重要! 就像在數學中的變數,編程中的變數能用來紀錄儲存位置(placeholders),以及儲存數據。 在一般的情況下,您可以建立或宣告(declare)一個變數,然後在程式開始時儲存或初始化其值。 然後,您可以在稍後的程式中使用該變數,並呼叫(call)該資料值。 x = 2 # Declaring variable x and initializing the value to 2 print(x) # Calling the variable in a print statement 您可以宣告(declare)多個變數來保存多個資料值。 請您確保都給它們命名不同的名字,因為在運行程式時,您將不斷呼叫變數,以改變其儲存之資料值。,如果您使用相同的名字作為新變數,新資料值將覆蓋舊資料值。 x = 2 # Declaring a variable x and initializing it to 2 print(“Old Value: ”,x) # Printing initial value of x x = 3 # Reassigning variable x to 3 print(“New Value: “,x) # Printing new value of x |
Step 3:
| 變數的種類
您可以將變數分配給其他類型的數據,如int, float, string 和boolean。 w = 4 # this is an int x = 3.2 # this is a float phrase = "Hello" # this is a string is_flying = True # this is a boolean
Python 的優點在於您不需要在變數初始化中包含數據類型。 像 Arduino 這類的程式語言中,您可能需要編寫 int w = 4,但在 Python中,您可以直接編寫 w = 4。 |
Step 4:
| 變數和CoDrone Mini
現在您已知道如何建立變數了,那讓我們在CoDrone Mini的程式中使用它們吧! 請建立一個名為 duration的變數並將其分配給一個整數值,這個正數值將表示您希望無人機執行操作的秒數。 接著,在程式中的函數內調用該變數。 import CoDrone_mini drone = CoDrone_mini.CoDrone() drone.pair() duration = 3 # initialize variable 'duration' to 3 drone.takeoff() drone.set_pitch(50) # Set positive pitch to 50% power drone.move(duration) # Pitch forward for 3 seconds drone.land() drone.close() 您可以在程式中多次呼叫(call)變數的資料值。 舉例來說,請參閱以下呈正方形飛行的程式碼。 import CoDrone_mini drone = CoDrone_mini.CoDrone() drone.pair() drone.takeoff() drone.set_pitch(50) drone.move(1) drone.set_pitch(0) drone.set_roll(50) drone.move(1) drone.set_pitch(-50) drone.set_roll(0) drone.move(1) drone.set_pitch(0) drone.set_roll(-50) drone.move(1) drone.land() 到目前為止,請問您會如何讓正方形變大呢? 您或許會獨自更改每個 move() 指令的持續時間。 但其實您是可以建立一個變數來表示持續時間,並且這樣做只需更改一次! import CoDrone_mini drone = CoDrone_mini.CoDrone() drone.pair() duration = 1 drone.takeoff() drone.set_pitch(50) drone.move(duration) drone.set_pitch(0) drone.set_roll(50) drone.move(duration) drone.set_pitch(-50) drone.set_roll(0) drone.move(duration) drone.set_pitch(0) drone.set_roll(-50) drone.move(duration) drone.land() 請更改持續時間的資料值,使正方形變大或變小。 為了精確的移動,您可以將 duration 分配給不同的數據類型。 請嘗試把duration分配到浮點數(float)、字串(string)及布林(Boolean)吧! duration = 2.5 duration = “4” duration = True |
Step 5:
| 調整變數
您其實還可以在程式中間更改持續時間的資料值哦! import CoDrone_mini drone = CoDrone_mini.CoDrone() drone.pair() duration = 1 drone.takeoff() drone.hover(duration) drone.land() duration = 2 drone.takeoff() drone.hover(duration) drone.land() duration = 3 drone.takeoff() drone.hover(duration) drone.land() 您是否注意到,每次重新分配變數時,它都會採用新資料值? |
Step 6:
| 數學中的變數
就像在上數學課時,您可以使用變數。 以下這些是您可以使用的數足額運算符號:
您認為以下的程式碼會輸出什麼呢? 試試看吧! y = 4 z = 3 x = y + z print(x) 您其實可以直接把資料值增加到變數中,而不用建立一個新的變數來維持總和。舉個例子來說, power = 5 # initialize a variable to 5 print(power) power = power + 5 # add 5 to power and reassign the value print(power) 您可以使用同樣的方法做減法、乘法和除法。 如果你在數學課上學過一些代數,您可能會覺得有點奇怪。 |
Step 7:
| 添加更多變數
您可以根據您的需要為程式建立任意數量的變數! 您只需對每個程式執行相同的步驟:建立一個變數,在程式頂部初始化其資料值,然後在需要時在程式中呼叫(call)它。 在您最後的程式中,您為 duration設置了一個變數,其中包括功率變數,您將其資料值設置為 25,然後它們將執行您的程式。 接著,您將其資料值更改為 75。 當功率變數值增加時將會發生什麼變化呢? import CoDrone_mini drone = CoDrone_mini.CoDrone() drone.pair() duration = 5 # initialize variable 'duration' to 5 power = 25 # initialize variable ‘power’ to 25 drone.takeoff() drone.hover(duration) # in this case, hover for 5 seconds drone.set_pitch(power) # Set positive pitch to 50% power drone.move(duration) # forward for 5 seconds drone.land() <span style="font-weight: 400;">drone.close()</span> |
Step 8:
| 挑戰
挑戰:變數 請建立至少 5 個變數並對它們使用數學運算使它們等於次功率值。 在您執行程式前,請記得匯入資料庫後,您需要建立一個無人機物件,然後配對CoDrone Mini! 規則如下:
|
Python_Junior_2B_Loops迴圈
Step 1:
| 什麼是迴圈?
迴圈能讓您重複執行同一段程式碼。 它是一個很棒的捷徑,如果沒有它,您可能不得以的重複性編寫相同句子。 在本課程中,您將了解while迴圈和for迴圈。條件迴圈 它們都是條件迴圈,因此它們僅在您設置的條件為是(True)時重複。 |
Step 2:
| 電腦如何計算?
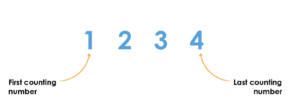
為了記錄我們在迴圈中重複代碼的次數,我們需要一種方法能讓電腦計數。 我們選擇一個起始數字,然後不斷將數字增加 1,直到我們達到我們想要達到的數字。
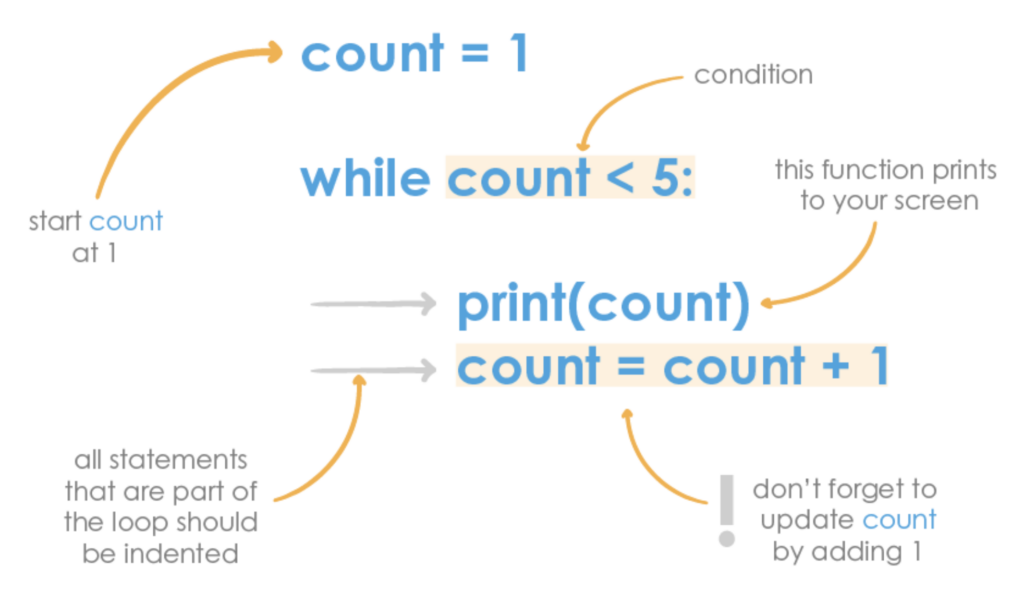
count = 1

while count < 5:
    print(count)
    count = count + 1
這是Python中的While迴圈。讓我們來分析一下吧! |
Step 3:
| While迴圈
當判斷值(condition)為真(true)時,While迴圈會一直重複那組程式碼。 這在生活中很常被使用!以下是它們的執行結果: while condition(s) go here:
statements goes here
在英語中,你可能聽過這樣的例子:只要我的手機有電量,我就會使用 Instagram(As long as my phone has battery, I will use Instagram.)。但在程式碼中,它會是這樣: while phone has battery:
I will use Instagram
要啟動While迴圈,判斷值必須為真(true),否則,將被省略。一旦判斷值為真(true),語句(statement)就會永不停止地執行。當判斷值(condition)變成假(false)時,程式將退出迴圈,並繼續執行其餘的程式。
|
Step 4:
| 編寫While迴圈
請使用 while 迴圈為CoDrone Mini 編程鏡頭俯仰(pushups),並限定只要變數超過 10 ,判斷值(condition)為真(true)。 import CoDrone_mini
drone = CoDrone_mini.CoDrone()
drone.pair()
pushups = 0
while pushups < 10:
drone.takeoff()
drone.hover(1)
drone.land()
pushups+=1 # increment pushups by 1
drone.close()
|
Step 5:
| For迴圈
For迴圈和 while 迴圈有些類似,它們都在在條件為真(true)時重複同一段程式碼。 但是,For迴圈判的斷值(condition)是由您設置的特定次數。 舉例來說,如果您只希望同一段程式碼重複 87 次,則可以使用 for 迴圈。 For 迴圈的條件判斷(conditional statement)遵循一種非常特殊的格式,雖然它看起來很嚇人,但別擔心,我們將對其一一講解! for private variable in range (minimum, maximum, increment or decrement):
Write statements here
以下有一個例子: for x in range(0, 10, 1):
print(x)
在第二次迭代(iteration)中,x 從 2 開始,請印“1”,然後 x 將變為 2。 0 1 2 3 4 5 6 7 8 9 您有發現“10”沒有被印出來嗎? 那是因為10是最大值。當Private variables(也就是在範例中的 x)達到最大值時,它將不被列印或超越。 您可以負移動並減量(decrement)或減少。 以下有一個例子: for j in range(-1, -13, -2):
print(j)
您認為結果將如何呢? 請在看下一部分之前先把它們寫下來吧! |
Step 6:
| 編寫For迴圈
請為CoDrone 編程,使其呈正方形飛行。 別忘了,電腦是從 0 開始計數,而且4 是最大值。 import CoDrone_mini
drone = CoDrone_mini.CoDrone()
drone.pair()
drone.takeoff()
for x in range(0, 4, 1):
drone.set_pitch(50)
drone.move(2)
drone.set_pitch(0)
drone.set_yaw(-50)
drone.move(2)
drone.set_yaw(0)
drone.land()
drone.close()
接著,請嘗試其他形狀,如三角形、五角形和六邊形! |
Step 7:
| 編程挑戰
請讓無人機做 5 個鏡頭俯仰(pushups)並輸出以下信息:“起飛”,“懸停”及“降落” 請嘗試使用 for 迴圈製作一個版本,再使用 while 迴圈製作另一個版本。 |
Step 8:
| 挑戰
挑戰:大怒神 在很多遊樂園中,最可怕的遊樂設施,大多為自由落體類型。 這些遊樂設施通常都會把搭乘者帶到高處後,緩慢的落下再快速的落下。 有很多自由落體的遊樂設施都會讓搭乘者落下,停止,再上升一點但不是很高,然後又暫停,再落下,再暫停…… 您的挑戰是請使用迴圈,編程CoDrone Mini與恐怖之塔有相同的飛行模式。 規則如下:
import CoDrone_mini

drone = CoDrone_mini.CoDrone()

drone.pair()


drone.takeoff()

drone.set_throttle(50)

drone.move(2)

drone.hover(1)


for x in range(0, 5, 1):

    drone.set_throttle(50)

    drone.move(2)

    drone.hover(1)

    drone.set_throttle(-40)

    drone.move(2)

    drone.hover(1)


drone.land()

drone.close()
|
Python_Junior_2C_Conditionals條件
Step 1:
| 什麼是if statements?
If statements也可說是條件(condition),它用於幫助您的程式做出決策。
在 Python 中的If 敘述式都會這樣寫: if insert condition here:
Insert statements here
else:
Insert statements here
請參閱我們提供的範例: if alarm goes off:
I will wake up
else:
Stay asleep
當電腦在檢查所有其他條件後,並遇到“else”選項時,else 條件將自動變為真並執行其程式。
|
Step 2:
| 縮排
縮排在 Python 中非常重要。 縮進指示那一些statement屬於代碼中的特定部分。 您可能已經註意到 if statement和 else statement下面的statement有 4 個空格或 1 個tab的縮排。 如果您希望使用適當的縮進在條件為真時執行多個statements,則參考如下所示: if battery_percentage > 60:
print("Ready for takeoff!")
drone.takeoff()
drone.land()
else:
print("Battery too low.")
以下為不正確的例子。 嘗試執行並觀察有什麼變化。 您的目標是:請修改範例並使用正確的縮排和修正語法(syntax)。 drones = 100
bugs = 55
if drones > bugs print("Squish the bugs!")
else print("Fly away!")
正確的範例應如下所示。 請您嘗試執行它並修改drone和 bugs 的值。 drones = 100
bugs = 55
if drones > bugs:
print("Squish the bugs!")
else:
print("Fly away!")
|
Step 3:
| 比較值
在最後步驟中,我們將為您介紹一個新符號。 > 符號是比較值中的例子,您或許在數學課中學過不等號。比較值可以在條件內部進行比較。 如果statement為真,則將執行下面的statement。 以下這些是比較值:
以下是使用它們的範例。您可以試試吧!請 在不更改值的情況下使用代碼,然後更改 X 和 Y,使總和等於 50。您也可以嘗試更改比較值,看看會有什麼變化! import CoDrone_mini
from CoDrone_mini import Direction
drone = CoDrone_mini.CoDrone()
drone.pair()
X = 10
Y = 30
if X + Y == 50:
print("Correct, X + Y is equal to 50.")
drone.takeoff()
drone.flip(Direction.Forward)
drone.land()
else:
print("Incorrect.")
|
Step 4:
| 編程作業
請建立具有不同數值的 3 個變數。 接著,請寫至少 3 個 if 敘述式和一個 else 敘述式。 請使用變數作為 if 敘述式的條件。If 敘述式和 else 敘述式的所觸發的程式裡,應該印不同的字串(strings)。 以下有一個的程式例子——請嘗試編寫您的程式吧! import CoDrone_mini drone = CoDrone_mini.CoDrone() drone.pair() x = 58 y = 12 z = 90 drone.takeoff() if x > y: drone.set_pitch(50) drone.move(2) if z > x: drone.set_roll(50) drone.move(2) if y+z > x: drone.set_yaw(50) drone.move(2) if y > z: drone.set_throttle(50) drone.move(2) else: drone.land() |
Step 5:
| 什麼是else if statements?
假設您有兩個按鈕:一個按鈕開門,另一個按鈕關門。 if button 1 is pressed:
Close the door
if button 2 is pressed:
Open the door
如果同時按下兩個按鈕,請問會有什麼變化呢?當兩者都為真(True)時,門會嘗試同時打開和關閉! Else if statement,在 Python 中會寫成 elif,它的用途是為了解決了以上的問題。 if button 1 is pressed:
Close the door
elif button 2 is pressed:
Open the door
|
Step 6:
| 雲霄飛車挑戰
這個挑戰是為了檢查搭乘者是否足符合最低限度的高度搭乘雲霄飛車。
import CoDrone_mini

drone = CoDrone_mini.CoDrone()

drone.pair()


height = 66  # height in inches

drone.takeoff()


if height > 48:

    drone.set_throttle(50)

    drone.move(3)

    print("Rider can ride alone")

elif height > 36:

    drone.set_throttle(50)

    drone.move(2)

    print("Rider must be accompanied by parent")

else:

    drone.set_yaw(50)

    drone.move(1)

    print("Rider not allowed on the ride")

drone.land()
drone.close() |
Python_Junior_2D_User Input
Step 1:
| 輸入
在之前的課程,您使用條件(conditionals)來檢查變數的值並做出決定,變數還需手動更改程式。 請問會不會有一種方法能與程式溝通並修改其結果而無需重寫程式呢? 獲取用戶輸入將使您在執行時使用輸入來設置變數值。 |
Step 2:
| 製作選單列(menu)
查看條件的最佳方法之一是建立飛行動作選單列(menu)。 在那裡,用戶可以使用 input() 函數輸入數字。 然後,無人機將根據特定數字的代碼飛行。舉例來說,當我們輸入數字3後,無人機將呈三角形飛行。 以下是選單列(menu)的例子。 指令執行後,選單列(menu)將再次顯示直到“退出”被選擇: Menu: Spin in place Fly in a right angle Fly in a triangle Fly in a square Exit |
Step 3:
| 自制選單列(menu)
您準備好為自己製作選單列(menu)了嗎?請匯入CoDrone Mini、方向、序列(sequence)和時間庫,然後建立無人機對象並配對無人機。 接著,請設置一個 while迴圈,再讓判斷值為是(true)時,印出選單列(menu)。 在 while 迴圈中,請把“菜單”包含在print指令,然後希望 CoDrone Mini 執行不同演習(maneuver)的選項。請確保您知道如何對您包含的每個動作進行編程,當然這可以是任何動作! 請確保這些選項之一是“退出”,因為這選項將結束 while 迴圈。 您的選單列(menu)應如同以下所示: import CoDrone_mini
from CoDrone_mini import Direction
from CoDrone_mini import Sequence
import time
drone = CoDrone_mini.CoDrone()
drone.pair()
while True:
print("Menu: ")
print("1. Spin Around \n"
"2. Flip\n"
"3. Sway\n"
"4. Square\n"
"5. Quit\n")
您想知道 \in是有什麼用途嗎?如果沒有\in,選單列(menu)可能會以非常不同的方式列印(print),它可能會列印一大段的代碼行而不是以一個區塊來列印多個statements。 請務必記得在下一個縮排處排列以下的行(lines),以免出現縮排錯誤! |
Step 4:
| 重置和用戶輸入
您的程式需要能夠讀取用戶輸入並決定要該執行哪一些代碼集。 您將使用 if statements和 else if statements來檢查用戶是否輸入“1”、“2”、“3”、“4”還是“5”。 請確保您仍處於 while迴圈中,然後將無人機的橫滾(Roll)、俯仰(Pitch)、偏擺(Yaw)、油門(Throttle)設置為 0。這樣它們就能為您每一次的演習(maneuver)做好編程的準備! 接著,請建立一個名為 option 的變數來儲存 input() 。在 input() 的參數(parameter)中,請寫上“Select an option”。這將打印(print)指令,且當用戶輸入數字時,它將被儲存為一個選項並在日後呼叫(call)。 以下為你應該呈現的樣式: drone.set_throttle(0)
drone.set_roll(0)
drone.set_yaw(0)
drone.set_pitch(0)
option = input("Select an option: ")
|
Step 5:
| 決策
根據用戶輸入,CoDrone 會以不同的模式飛行! 當然,設置它的最好方法是使用條件(conditionals)。它可以讓無人機起飛,然後選擇選項 1(option 1),再設置一個 if statement及把無人機演習(maneuver)包括在內。 drone.takeoff()
if option == "1":
drone.set_yaw(30)
drone.move(2)
對於選項 2 到 4,請使用 else if statement,然後把無人機演習(maneuver)包括在內。 elif option == "2":
drone.flip(Direction.FORWARD)
elif option == "3":
drone.fly_sequence(Sequence.SWAY)
elif option == "4":
drone.fly_sequence(Sequence.SQUARE)
對於選項 5,請使用另一個 else if statement且包含打印(print)指令,該指令需顯示“You have quit the menu”然後再中斷。這樣將退出迴圈。 elif option == "5":
print("You have quit the menu.")
break
接著,請把else statement包括在內,它將扮演當無效的用戶輸入的時候(如 1-5 之外的數字),起執行作用。 else:
print("Not a valid input. Try again.")
最後,請讓無人機降落,然後(此為可選)包含一個打印(print)指令,該指令需顯示“Done”。 drone.land()
print("Done")
|
Step 6:
| 最後代碼
你的最終程式該長得如下: import CoDrone_mini
from CoDrone_mini import Direction
from CoDrone_mini import Sequence
import time
drone = CoDrone_mini.CoDrone()
drone.pair()
while True:
print("Menu: ")
print("1. Spin Around \n"
"2. Flip\n"
"3. Sway\n"
"4. Square\n"
"5. Quit\n")
drone.set_throttle(0)

    drone.set_roll(0)

    drone.set_yaw(0)

    drone.set_pitch(0)


    option = input("Select an option: ")
drone.takeoff()

    if option == "1":

        drone.set_yaw(30)

        drone.move(2)
    elif option == "2":
        drone.flip(Direction.FORWARD)

    elif option == "3":

        drone.fly_sequence(Sequence.SWAY)

    elif option == "4":

        drone.fly_sequence(Sequence.SQUARE)
    elif option == "5":

        print("You have quit the menu.")

        break
    else:

        print("Not a valid input. Try again.")
    drone.land()

print("Done")
|
Step 7:
| 遙控器
用戶輸入非常適合用於遠程操控無人機! 在本活動中,您將把鍵盤進行編程以充當遙控器,並使用“wasd”和“ijkl”字母鍵作為搖桿。 首先,請匯入CoDrone Mini資料庫 和時間庫,然後再建立無人機對象,之後配對無人機。 接著,請把“Command options”的打印(print)指令包含在內,然後再為8個飛行指南中的每個方向打印(print):正橫滾、負橫滾、正俯仰、負俯仰、正偏航、負偏航、正油門和負油門。請確保您有把“退出”選項包含在內,這將使無人機降落。 您的選單列(menu)應如同以下所示: import CoDrone_mini
import time
drone = CoDrone_mini.CoDrone()
drone.pair()
print("Command Options: ")
print("w: throttle up \n"
"s: throttle down\n"
"a: yaw left\n"
"d: yaw right\n"
"i: pitch forward\n"
"k: pitch backward\n"
"j: roll left\n"
"l: roll right\n"
"q: quit")
|
Step 8:
| 起飛
請讓您的無人機起飛,然後根據需要設置配平(Trim)。這將適用於如果無人機在漂移時,您想要固定其俯仰(Pitch)或橫滾(Roll)。因此如果您沒有遇到以上的問題,則可以跳過此步驟。 接著,請建立一個名為 power 的變數並將其值設置為 40。這樣,預設功率將設為 40。 您的代碼應如下所示: drone.takeoff() drone.set_trim(0,0) # Adjust for your drone power = 40 |
Step 9:
| While 迴圈 請設置一個 while迴圈,再讓判斷值為是(true)時,讓程式可以根據用戶輸入做出決定。 接著,請將橫滾(Roll)、俯仰(Pitch)、偏擺(Yaw)、油門(Throttle)重置為 0。 請建立一個名為 direction 的變數來儲存 input() 。 在 input() 的參數中,請寫上“Input a command:”。 它將打印該指令,且當用戶輸入一個字母時,它將會儲存為一個選項並在日後呼叫(call)。 您的代碼應如下所示: while True:
drone.set_throttle(0)
drone.set_roll(0)
drone.set_yaw(0)
drone.set_pitch(0)
direction = input("Input a command: ")
|
Step 10:
| 做決定
就像當用戶輸入選單列(menu)時,您需要使用 if 敘述式、else if 敘述式和 else 敘述式使無人機根據用戶輸入往不同的方向飛行。 對於 w 鍵,您可以使用 if 敘述式,然後包含一個指令能使您的無人機的油門加速。 在參數中,請使用功率變數使無人機以 40% 的功率移動。 if direction == "w":
drone.set_throttle(power)
對於其餘的 7 個飛行指令,請使用 else if 敘述式。 如果您希望無人機往左、往下或往後移動,請在參數中的功率變數旁放一個負號。 elif direction == "s":
drone.set_throttle(-power)
elif direction == "a":
drone.set_yaw(-power)
elif direction == "d":
drone.set_yaw(power)
elif direction == "i":
drone.set_pitch(power)
elif direction == "k":
drone.set_pitch(-power)
elif direction == "j":
drone.set_roll(-power)
elif direction == "l":
drone.set_roll(power)
請為退出選項寫多一個 else if 敘述式。這個Else if 敘述式將會等待,以便不會跳過降落指令,請使無人機降落並且退出迴圈。 elif direction == "q":
time.sleep(0.05)
drone.land()
break
請包括一個選項是能讓用戶知道他們犯了錯誤,這樣當他們輸入的內容不是程式中的選項,將會印出提醒。 else:
print("Not a command")
最後,請在參數中包含延遲和一秒的移動指令。 time.sleep(0.05)
drone.move(1)
在迴圈以外,請包括一個打印(print)指令,以便您知道何時退出程式。 print("Done")
|
Step 11:
| 挑戰
挑戰:超級程式 您將會有一個程式能使用數字讓 CoDrone Mini 做不同的演習(maneuver)。此外,您有另一個程式可以使用字母讓 CoDrone Mini 往不同的方向飛行。如果您將它們組合成同一個程式中,請問會怎麼樣呢? 規則如下:
|
