Python (Beginner)_ First Program第一次編程
Step 1:
| Hello World!歡迎體驗第一次編程Python
是時候第一次進行編程Python!我們需要用到函式print() 。你不需要墨水和紙真的印出來,而是在螢幕上顯示讓你可以看到所有程序輸出。這讓你方便追蹤變數值和找到程式碼中的錯誤。 開啟新的Jupyter notebook再輸入以下程式碼到新的儲存格: print("Hello world!")
點擊”Run(運作)” 並看著螢幕會印出你的詞組。 從1970年代開始“Hello World”程序一直用來介紹給初學編程者認識新的程式語言。歡迎使用Python! |
Step 2:
| 練習列印
試著在螢幕印出不同詞組。並加入其他列印語句在同一個儲存格!只要記得將詞組放在引號中,告知電腦你要印的字符串開頭與結尾。字符串是字符的集合,可以包括字母、標點符號、數字,甚至空格! 試試以下範例: print("Hello, CoDrone!")
print("Hi, CoDrone!")
print("Hey, CoDrone!")
試著運作程式碼看看字符串會用什麼順序列印! |
Step 3:
| 使用print()函式的技巧
你可以在任何你想要欄標或內縮的字符串使用\t print("\t This is how much space a tab gives")
想知道欄標能給多少空白,請測試!請複製以下文字到新的儲存格在按下”Run(運作)” print("\t This is how much space a tab gives")
如果你需要多加一行就像按下enter鍵,請在你想要斷句的地方用\n print("This is how you \n break phrases \n into parts")
|
Step 4:
| 留言
有時你可能會想要留下註解或備忘錄給自己或別人,但希望電腦忽略他。留言是個描述你程式碼的好方法。你可以透過在行列中最開始的地方加入(#)符號,好讓你在程式碼中留言。如果你需要寫較長的留言,在兩組三重引號或三重撇號之間插入程式碼塊。 試試下面的程式碼吧! # print("The computer is ignoring this")
print("The computer is printing this!")
'''
This is a longer comment that the computer will not read:
Robots
Play
Yellow
Trombones
'''
|
Step 5:
| 配對與列印
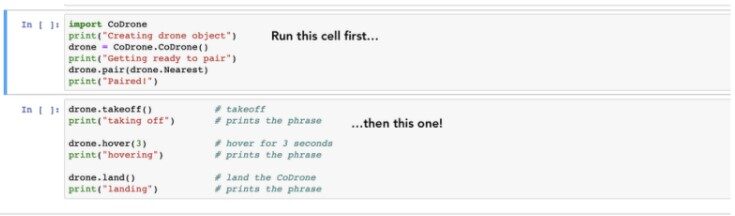
現在你將學習如何把列印語句與CoDrone結合!在新檔案中請加入CoDrone資料庫。 import CoDrone 加入CoDrone資料庫後,請創建一個使用在數據集結變數與函式的新目標。請創建“drone(無人機)”如以下編寫內容: drone = CoDrone.CoDrone() 在此範例中CoDrone只是一種類別,目前你不需要了解太多細節,但你要知道類別就像一個工廠可以讓CoDrone()成為目標。所有目標都具有相同特性與相同可進行的函式。 現在請將無人機與BLE板(低功耗藍芽板)連接上 drone.pair(drone.Nearest) 我們強烈建議你在第一次配對CoDrone先使用drone.pair(drone.Nearest)再在配對後至少用一次drone.pair()。這樣以後你的板子會只跟你配對過的CoDrone配對上。當你在人多的教室或空間時這相當有助你能順利配對自己的無人機。 請加入一些特別的列印語句到程式碼來練習! import CoDrone
print("Creating drone object")
drone = CoDrone.CoDrone()
print("Getting ready to pair")
drone.pair(drone.Nearest)
print("Paired!")
按照你在資料庫和驅動程序安裝課程中,步驟 4李 學到的相同步驟運作程式碼。如果配對上,你的BLE LED燈和CoDrone尾部LED燈會出現穩定不閃爍綠燈。 |
Step 6:
| Takeoff!起飛!
操作此程式碼時請確認CoDrone附近地板上沒有其他障礙物。 接下來你要試著寫出飛行測試的程式碼!寫下drone.takeoff()指令可以讓CoDrone起飛並盤旋,如果你需要請加入列印語句: drone.takeoff()
print("taking off")
下一步,請編程讓你的無人機在空中盤旋久一點。還記得你在寫列印語句時在括號中放入詞組嗎?括號中的值都稱為參數,它提供函式運作時可能需要的任何數據。print() 函式接受一個字符串作為參數。函式drone.hover()的參數是你希望無人機在空中盤旋的時間。 drone.hover(3)
print("Hovering")
別忘記要著陸! drone.land()
print("landing")
在運作完整的程式碼前:
|
Step 7:
| 編輯程式碼
如果你需要重寫程式碼在重新測試一次,你只要編輯第二個儲存格,無須與無人機或電池斷開連結。 舉個例子:你若想要讓無人機盤懸5秒而非3秒,請編輯你的儲存格: drone.takeoff() # takeoff
print("taking off") # prints the phrase
drone.hover(5) # hover for 5 seconds
print("hovering") # prints the phrase
drone.land() # land the CoDrone
print("landing") # prints the phrase
不需要斷開你的CoDrone連結再重新執行,在已經配對的狀況下,你只需要重新跑一次程式即可。程式碼會在修改後立即運作。當然,你始終可以重新啟動並清除輸出,再按順序運作兩組程式。此外有個新方法比較方便。在未來的課程中請記得你寫過的所有程式碼,在此配對的過程我們省略解釋,但它依然是順利運作程式碼的必要內容。 |
Step 8:
| Challenge 試試看!
挑戰: CoDrone 伏地挺身 試試用一組程式碼讓你的CoDrone連續起飛著陸5次!目前你手上的程式碼只能讓你的無人機伏地挺身一次。 規則:
來比賽看誰的CoDrone在10秒內做最多組伏地挺身! |
Python (Beginner)_ Flight Movements飛行動作
Step 1:
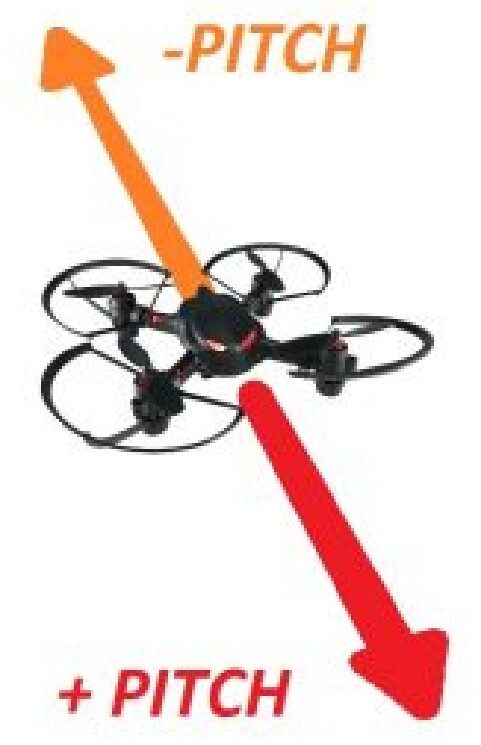
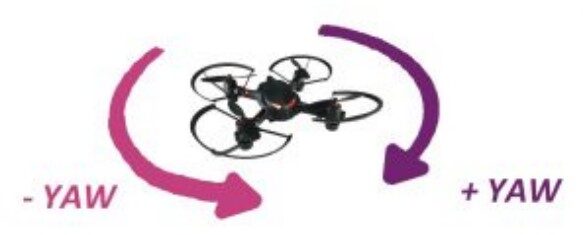
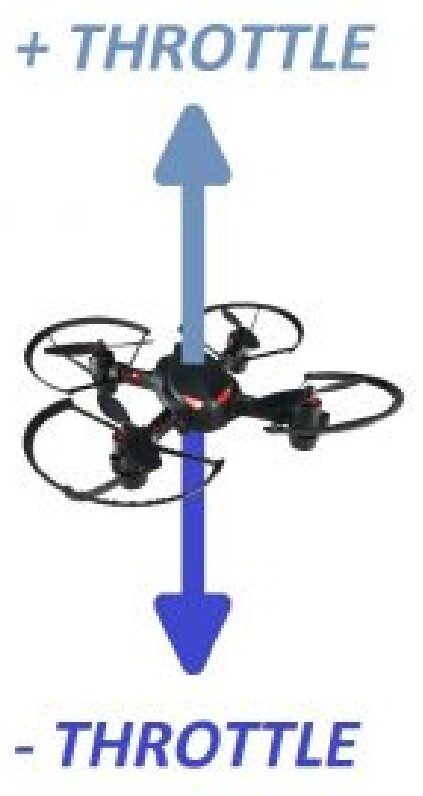
| Roll, pitch, yaw, throttle
橫滾(左右移動)、俯仰(前後)、偏航(機身左右旋轉)和油門上升或下降 飛行器的移動方式與陸地車輛有點不同。儘管陸地車輛可以向前、向後,有時還可以左右移動,但飛行器還能上下移動。想要確認 CoDrone是如何在三維空間中移動,你可以使用以下術語: 橫滾控制的是CoDrone的橫向或是側向移動。Positive roll(正向橫滾)是把CoDrone向右移動;而negative roll(負向橫滾)是把CoDrone向左移動。 drone.set_roll(power) # power represents power out of 100%
# power can be between -100 and 100
俯仰是 CoDrone 向前和向後傾斜。CoDrone往前傾斜移動是Positive pitch(正向俯仰),而negative pitch(負向俯仰)是往後傾斜移動CoDrone。 drone.set_pitch(power) # power represents power out of 100%
# power can be between -100 and 100
偏航是CoDrone左右旋轉。Positive yaw(正向偏航)讓你的CoDrone向右轉;而negative yaw (負向偏航)是向左旋轉。 drone.set_yaw(power) # power represents power out of 100%
# power can be between -100 and 100
油門控制了CoDrone的垂直向上或下移動。Positive throttle(催油門)會讓CoDrone往上飛高;而negative throttle(收油門)讓CoDrone往下飛低。 drone.set_throttle(power) # power represents power out of 100%
# power can be between -100 and 100
請小心操作偏航和橫滾,偏航會左右轉CoDrone,而橫滾會左右移動CoDrone。
|

Step 2:
| 盲飛無人機
學習新詞彙的最佳方法之一,就是觀察它們的實際操作,因此你不僅要記住所有的飛行動作,你還要完成障礙賽!找個朋友坐下並矇註他們的雙眼(或是要他們雙眼閉上就好) 接下來,只使用飛行動作詞引導他們讓他們最後坐在另一把椅子上通過障礙課程。請先確保任何危險的東西都遠離他們!
例如:如果你要你朋友往前走,請說“Positive pitch (正向俯仰)2步.”就可以讓你朋友了解你要他們往前走2步。一旦你的朋友成功完成障礙賽,輪流換他們幫你指向! |
Step 3:
| 使用飛行指令
第一項挑戰:讓你的CoDrone起飛、往前、左轉再降落。首先,請加入CoDrone資料庫再配對上你的無人機:
import CoDrone

drone = CoDrone.CoDrone()
drone.pair(drone.Nearest)
# drone.pair() if paired to CoDrone before
drone.takeoff()
下一步,你可以加入剛才新學的函式進去! import CoDrone drone = CoDrone.CoDrone() drone.pair(drone.Nearest) # drone.pair() if paired to CoDrone before drone.takeoff() # takeoff for 2 seconds drone.set_pitch(30) # Set positive pitch to 30% power drone.move(2) # forward for 2 seconds drone.set_yaw(-50) # Set negative yaw to 30% power drone.move(2) # turn left for 2 seconds drone.land() # lands the CoDrone drone.close() # disconnects CoDrone 你是否疑惑為何一個動作需要兩行程式碼嗎?函式drone.set()會讓CoDrone準備朝特定方向與速度移動,而函式drone.move()會實際讓CoDrone在空中移動。 或許你會發現,當你左轉CoDrone時,它仍然向前移動,在後續步驟中,我們再為這個狀況解釋 |
Step 4:
| 同時使用多組飛行指令
在你將值改回 0 或其他值之前,每次使用某飛行指令後,它會永久為該方向設定這個值。這也是 CoDrone 可以同時向多個方向飛行的原因。這聽起來很奇怪,但這就是代表CoDrone飛行其他方向時,可以進行對角飛行或是邊轉邊飛等等操作。 請試著運作以下程式碼並觀察無人機飛行狀況! import CoDrone drone = CoDrone.CoDrone() drone.pair(drone.Nearest) # drone.pair() if paired to CoDrone before drone.takeoff() # takeoff for 2 seconds drone.set_pitch(30) # Set positive pitch to 30% power drone.set_roll(-30) # Set negative roll to 30% power drone.move(2) # forward and right for 2 seconds drone.land() # lands the CoDrone drone.close() # disconnects CoDrone |
Step 5:
| 函式drone.go()
飛行指令有時會讓人感到困惑。試試函式drone.go(),以下是函式表達內容: drone.go(direction, duration, power) 以下是拆解後的大意
以下是範例: drone.go(UP, 3, 75) # go up for 3 seconds at 75% power drone.go(FORWARD) # go forward for 1 second at 50% power drone.go(LEFT, 6) # go left for 6 seconds at 50% power 如果你要在編程中使用函式drone.go(),你需要在最上方(在import CoDrone:下面)加入以下文字: from CoDrone import Direction 之後你可以試著在你於步驟3編程中將drone.go()代替drone.set()和drone.move(),並觀察發生什麼變化? |
Step 6:
| 編程任務
請用你剛才學的CoDrone方向編程,讓他在一個方形空間飛行。你可以使用函式drone.set() 和drone.move()或drone.go()。使用drone.set() 和 drone.move() 你需要在方形空間中每一個飛行動作後持續重設飛行方向回到0。請看以下範例: import CoDrone
drone = CoDrone.CoDrone()
drone.pair() # pairs to previous drone
drone.takeoff() # takeoff for 2 seconds
drone.hover(3) # hover for 3 seconds
drone.set_pitch(30) # set positive pitch at 30% power
drone.move(2) # forward for 2 seconds
drone.set_pitch(0) # reset pitch to 0 to stop moving forward
drone.set_roll(-30) # set negative roll at 30% power
drone.move(2) # left for 2 seconds
drone.set_roll(0) # reset roll to 0 to stop moving sideways
drone.set_pitch(-30) # set negative pitch at 30% power
drone.move(2) # backward for 2 seconds
drone.set_pitch(0) # reset pitch to 0 to stop moving backward
drone.set_roll(30) # set positive roll at 30% power
drone.move(2) # right for 2 seconds
drone.set_roll(0) # reset roll to 0 to stop moving sideways
drone.land() # lands the CoDrone
drone.close() # disconnects CoDrone
若使用函式drone.go()編程內容會是如下範例: import CoDrone from CoDrone import Direction drone = CoDrone.CoDrone() # easier to type drone drone.pair(drone.Nearest) # pairs to nearest drone drone.takeoff() # takeoff for 2 seconds drone.hover(3) # hover for 3 seconds drone.go(FORWARD, 2, 30) # moves the drone forward for 2 seconds at 30% power drone.go(LEFT, 2, -30) # moves the drone left for 2 seconds at 30 power drone.go(BACKWARD, 2, -30) # moves the drone backward for 2 seconds a 30% power drone.go(RIGHT, 2, 30) # moves the drone right for 2 seconds at 30% power drone.land() # lands the CoDrone drone.close() # disconnects CoDrone |
Step 7:
| Challenge 試試看!
挑戰跳台式飛行 請相隔兩張桌子或椅子2英尺。目標讓CoDrone從一張椅子起飛,再下降到另一張椅子上,再轉一圈飛回到起始點的椅子,會像以下文字示意動作: A -> B then B -> A 從A飛到 B 再從B飛回 A 規則:
小提示: 你可以在程式碼中間使用drone.land()再起飛一次。 |
Python (Beginner)_ Variables變數
Step 1:
| 何謂變數?
變數在所有程式語言和大多數程序中都很重要!就像數學,變數是佔位符和數字的數據存儲。一般來說你可以在編程的一開始,先設定或宣告一個變數,並儲存或初始化它的值,之後你可以在編程中用變數時把時把它呼叫出來使用。 x = 2 # Declaring variable x and initializing the value to 2 print(x) # Calling the variable in a print statement 你可以說明多重變數來保存多個值,一定要給它們不同的名字,因為在運作程序時變數會改變值。如果你創了一個與前一個同名的新變數,新值將覆蓋舊值。 x = 2 # Declaring a variable x and initializing it to 2 print(x) # Printing initial value of x x = 3 # Reassigning variable x to 3 print(x) # Printing new value of x our variables. What do you think the following code will output? Try it out! 就像式數學課,你會用到變數。你覺得以下程式碼會如何輸出?操作試試看! y = 4 z = 3 x = y + z print(x) 這也適用於減法、除法、乘法和其他數學函式! 在以後的課程中,你會了解操作時遇到的例外。 |
Step 2:
| 變數的種類
你也能指示變數變成其他數據類型,像是int、float、string和 boolean。 w = 4 # this is an int x = 3.2 # this is a float phrase = "Hello" # this is a string is_flying = True # this is a boolean
如果你熟悉其他程式語言,你或許會疑為何我們不在初始化中加入數據類型,例如: # Warning! This is NOT proper Python syntax int w = 4 float x = 3.2 String phrase = "Hello" bool is_flying = True 在Python中,變數可以保存任何類型的值,而無須指定數據類型。 |
Step 3:
| 練習列印變數
請創造4個變數:一個整數、一個小數、一個字符串、再隨意一個你指定的數字在每個變數中加入print語句。運作程式碼吧! 以下範例給你參考: x = 2 y = 25.3 z = 0.375 phrase = "message received" print(x) print(y) print(z) print(phrase) |
Step 4:
| 變數與CoDrone
現在你了解如何創造變數了,一起把它加入編程CoDrone吧!創造一個變數稱為duration,並給予它一個值代表你希望無人機執行操作的秒數。下一步,在程序中的函式叫出該變數。 duration = 3.5 # initialize variable 'duration' to 3.5 drone.takeoff() drone.hover(duration) # in this case, hover for 3.5 seconds drone.set_pitch(50) # Set positive pitch to 50% power drone.move(duration) # forward for 3.5 seconds drone.land() drone.close() |
Step 5:
| 重新指定變數
請改變維持時間的值觀察CoDrone的反應。維持動作時間增加,CoDrone會盤旋在空間久一點。 duration = 5 # initialize variable 'duration' to 5 drone.takeoff() drone.hover(duration) # in this case, hover for 5 seconds drone.set_pitch(50) # Set positive pitch to 50% power drone.move(duration) # forward for 5 seconds drone.land() drone.close() |
Step 6:
| Challenge 試試看!
挑戰:方形中的變數 請利用我們提供的設定程式碼讓你的CoDrone起飛再飛程一個方型圖案。備註: 次此持式碼只會讓你的無人機起飛,催油門升起再著陸,你要自己做其他編程讓CoDrone飛成一個方形形狀! 規則:
A = 1; B = 500; C = 5; D = 2; E = 10; F = 3; drone.takeoff() drone.set_throttle((C * C) * F) # 5 * 5 * 3 = 75; set throttle power t 75% drone.move(A * D); # 1 * 2 = 2 ; move for 2 seconds drone.land()drone.close() |
